
Shown below is a cut chart from the Hypertherm Powermax 65 manual for use with 65-amp shielded consumables on mild steel. You will notice an exploded view of the consumable parts used in this 65-amp shielded setup at the top. Be sure you are using all of the correct part numbers before you start. Similar charts are available for 85-amp, 45 amp, & Finecut consumables for mild steel, stainless steel, and aluminum. All these charts are available for shielded and un-shielded consumable sets. Most operators choose to use the shielded consumables since the shield protects the nozzle, so choose shielded or un-shielded and use the appropriate charts for your selection. I would choose shielded.
Using these charts is simple, just start from the left column and move the right ensuring all the suggested settings are being used by your cnc tables control software. Before we do this, you need to know what material thickness you will be cutting and choose the amperage you wish to cut it with. I would choose to use a 45-amp Finecut or 45-amp shielded setup for gauge metals up to 10g or .125", 65 amp shielded for .125" - .375", 85 amp shielded for .375" - .625", and so on. Once you choose your amperage, select the appropriate chart, find your material thickness in the left column, and look to the columns on the right for the appropriate settings. When you get to the Cut Speed and Voltage columns, I suggest using the values in the Best Quality Settings columns and ignore the Production Settings.
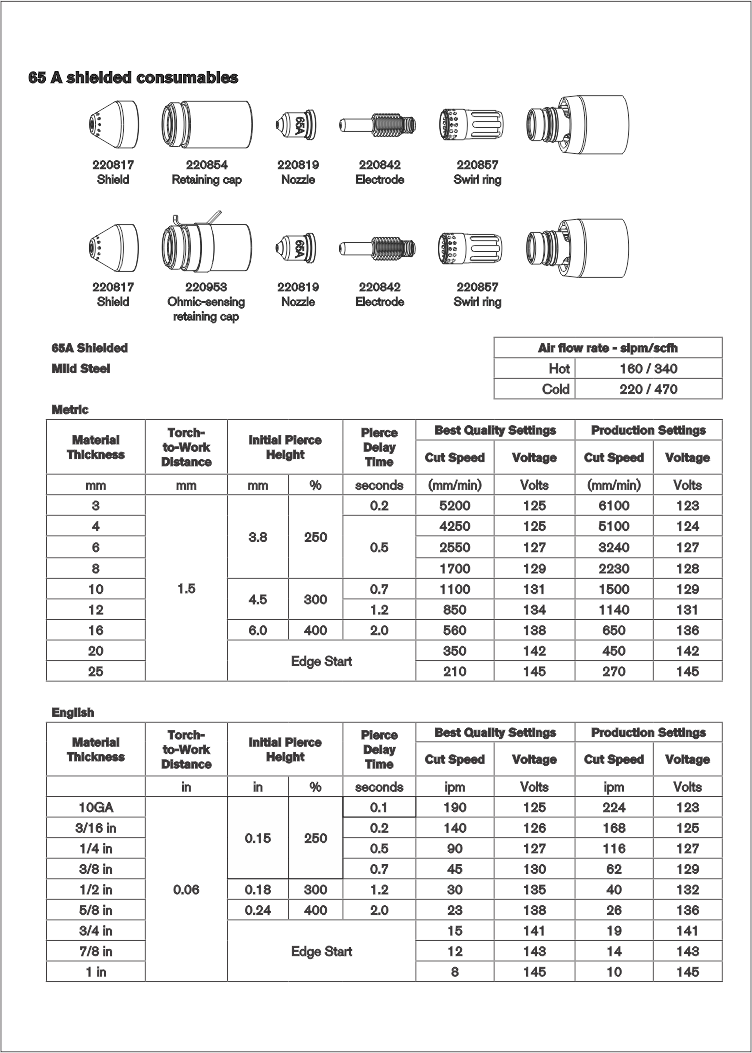
Settings Explained:
Material Thickness: The material thickness you intend to cut. Select the material thickness closest to what you will be cutting, if your material is not shown, use the settings for the next material size thinner to start with.
Torch to Work Distance: This is the cutting height you want to try to maintain at all times and is the distance between the work piece and the shield or nozzle.
Initial Pierce Height: This is the height you want to be at when the torch is piercing the material at the beginning of the cut. This is also measured between the work piece and the shield or nozzle.
Pierce Delay Time: This is the length of time you want the torch to remain still so it can pierce the material before beginning to move. Shown in seconds in this chart, many systems will be in milliseconds so 0.1 second would be 100 ms, 0.2 seconds would be 200 ms, etc.
Cut Speed: The cut speed is the speed you want to be cutting at. I would suggest using the speed listed in the Best Quality Column for lower speeds and best results.
Arc Voltage: If you have a THC (torch height controller) this is the voltage setting you want to start out at. This is the voltage across the arc and relates to your cut height. If your arc is longer your voltage is higher, if the arc is shorter your voltage is lower. The idea is that if your THC maintains the voltage listed in the chart, your Torch to Work Distance should be close to the suggested cut height we described above. If you do not have a THC you can ignore this.
In the event that you do not have cut charts for your plasma cutter you can easily develop your own. Chances are you cut the same materials, so you only need to determine the settings for those materials, and it is pretty easy to do. Start by using settings from a chart like what’s shown above as a starting point and begin testing from there. For example, if you have a 45-amp plasma cutter choose the 45-amp Hypertherm chart for starting settings and begin your testing. Download the Hypertherm 45, 65, and 85-amp charts
Once you have downloaded the charts and selected the material and amperage you will be working with, install new consumables in your torch and draw yourself a long straight line roughly 24" in length. A long line will give you the opportunity to pause the machine mid cut to make setting changes or measure your torch to work distance before you resume cutting again. For developing these charts, you will want your THC off, and use a fixed cutting height of .060" to start.
With the base settings entered and THC off, begin cutting a straight line and right away you will know if your Pierce Delay is too long, or too short. Too short, and the torch begins to move before sparks have exited the bottom of the material, too long, and the torch just sits there blowing sparks out the bottom when it should already be moving. Tweak the pierce delay time until you get it just right, you can pause and restart many times along the 24" line until you get it right but be sure your not piercing where the material has already been cut, be over fresh solid material to get timing right.
Once we are piercing and moving at the right time, allow the torch to cut a couple inches then pause the machine. Check the distance between the torch and the material with feeler gauges to confirm we are at the .060" height we wanted to start at. If the height looks good for now resume cutting and look for the sparks exiting the underside of the plate. If they are spraying up at you once the XY motion begins you are cutting far too fast, pause the machine, drop the speed, and restart. You want to see the sparks exiting the bottom of the material and just trailing behind the cut a little, if they are spraying ahead of the cut, your cutting too slow, if trailing way behind, your cutting too fast. After cutting a 24" line or 2 you should have determined a speed where the sparks are trailing behind the cut a little, not ahead, straight down, or far behind. Document this speed.
With the cut speed determined we can now fine tune the cut height. For this you can refer to the Cutting Height tutorial to determine if your current .060" cutting height is too high, too low, or spot on. Cut as many straight lines as needed, pausing, and reviewing your cut edge and adjusting your cut height as needed until you find the ideal height producing the squarest edge and then document it.
If you have a THC, we now need to determine the best voltage to use for it. Remember that arc voltage relates the length the arc, and the length of the arc relates to our cutting height. We need to find the proper voltage to use so the THC can maintain that voltage, which will in turn maintain our cutting height by adjust the Z axis up or down as needed. So again, we will go back to cutting another 24" line but this time with the THC turned on. Start out with an arc voltage roughly 20% higher that what the Hypertherm chart is suggesting, its better to be too high than too low as too low could force the torch into the material while its cutting. Start cutting the line and pause 2-3" into the cut. Stack up your feeler gauges so they measure the proper cutting height we determined in the previous step and measure the distance between the torch and the material. If your too high, reduce your arc voltage by 5 volts, if you too low increase by 5 volts, resume the cut and pause again once another 2-3" into the cut. Measure again and continue to adjust the voltage and cutting until you find the arc voltage that achieves the cutting height we want. Document this as the correct arc voltage for this material and amperage combination.
Arc voltage is not a set it and forget it type of thing, whenever you change material thickness, amperage, or cut speed your arc voltage will need to be tweaked to get back to the proper height. Hopefully this helps those of you who don't have manufacturer provided charts for cnc cutting to get more accurate and more consistent cuts. To download a blank cut chart and begin populating with values for your own use, you can use this link Blank Cut Chart
Good luck and have fun